
Appearance
Customizing the LiveOps Dashboard Frontend
This page documents customizing the LiveOps Dashboard to your game's needs.
This page documents customizing the LiveOps Dashboard to your game's needs.
The LiveOps Dashboard is a powerful tool that provides a large amount of out-of-the-box functionality to help you visualize and manage your game and player data. While the default dashboard may suffice, we recommend some light customization to make it even better for your game. Furthermore, all hit games will eventually want to add entirely new features or integrate external tools. This page outlines an overview of our tech stack and will guide you on how to customize the dashboard project.
We recommend using Visual Studio Code as your IDE for working with the dashboard project. It has excellent TypeScript support, a built-in terminal, and a wide range of extensions that make web development a breeze.
Specifically, you should install the following extensions:
This way your IDE will give you instant feedback on your code quality as you type.
The dashboard project comes with a few commands that you can run from the terminal. They are all listed (and updated from time-to-time) in the package.json file in the dashboard project folder. Here are the most common ones:
pnpm dev - Starts a development server with hot reloading and debugging enabled.pnpm build - Builds the dashboard project for production.pnpm lint - Runs the formatter and linter on the dashboard project files.We have based the dashboard tech stack on ease of use and widespread familiarity. You and your colleagues might already be familiar with some or all of the included frameworks and hiring freelancers with experience with them is easy:
In general we have picked tools that make it easy for developers unfamiliar with web development to pick it up quickly and avoid the most common web development pitfalls.
Don't like automatic code formatting?
We have configured Prettier to run as a part of the linting step. You can disable Prettier formatting by changing you local eslint.config.js file to import linting rules from import MetaplayEslintConfig from '@metaplay/eslint-config' instead of import MetaplayEslintConfig from '@metaplay/eslint-config/recommended'.
Inside your game’s backend project is a Dashboard folder that houses your dashboard project. This project is a standard Vue project pre-configured to import our SDK as a Vue plugin and provides a gameSpecific.ts file as an easy starting point for your additions.
You can fully adopt this dashboard project as your own and add any number of 3rd party plugins, components, and libraries as you would in a vanilla Vue project!
Backend                       The game's backend folder
+---Dashboard                 Dashboard project folder
¦   +---dist                  Output folder for the dashboard's build artifacts (auto-generated during build)
¦   +---gamespecific_tests    Optional Cypress end-to-end tests
¦   +---node_modules          Dependencies (auto-generated by npm install)
¦   +---public                Static hosted project files
¦   +---src                   Dashboard project source files
¦   ¦   main.ts               The main entry point of the dashboard project
¦   ¦   gameSpecific.ts       Example file for how to customize the dashboard project
¦   index.html                The landing page of the dashboard project
¦   package.json              Dashboard project's NPM configuration and dependencies
¦   ...and other project configuration files
Depending on the scope of your customizations, we support two main approaches in order of preference:
Integration API (recommended!) - We continue to build lightweight integration hooks into the core dashboard code that allow you to inject game-specific content and change how it looks. Using the API is highly recommended when possible, as it makes future SDK updates very easy!
Modifying the core SDK code - Hacking away in the core source files under the SDK's Frontend folder is the most flexible way to do a pinpointed change to a part of the dashboard. The major downside is that all changes to the core files are guaranteed to conflict with future updates and will require active maintenance. When exploring this option, we recommend that you contact our support team so we can work out a long-term solution together.
Good to know
Our long-term goal is to make the dashboard as data-driven as possible. This will reduce the need to use any of the above manual customization methods as the dashboard will automatically adapt to your C# code!
The @metaplay/core module exports our integration API and serves as an entry point for custom content. For example, the GameSpecificPlugin can be used to add global Vue plugins and run any code other than Vue initialization code. In most cases, you can use it to call our setGameSpecificInitialization() to do pinpointed modifications to the dashboard.
// Import the integration API.
import { setGameSpecificInitialization } from '@metaplay/core'
// Helpful types for the vue app.
import type { App } from 'vue'
/**
* This is a Vue 3 plugin function that gets called after the SDK CorePlugin is registered but before the application is mounted.
* Use this function to register any Vue components or plugins that you want to use to customize the dashboard.
* @param app The Vue app instance.
*/
export function GameSpecificPlugin (app: App) {
// Feel free to add any customization logic here for your game!
setGameSpecificInitialization(async (initializationApi) => {
// Set the game logo (shown in the navigation sidebar).
initializationApi.setGameIconUrl(GameIconUrl)
// Custom resources (shown in the player overview card).
initializationApi.addPlayerResources([{
displayName: 'Gold',
getAmount: (playerModel) => playerModel.wallet.numGold,
},
{
displayName: 'Gems',
getAmount: (playerModel) => playerModel.wallet.numGems,
}])
})
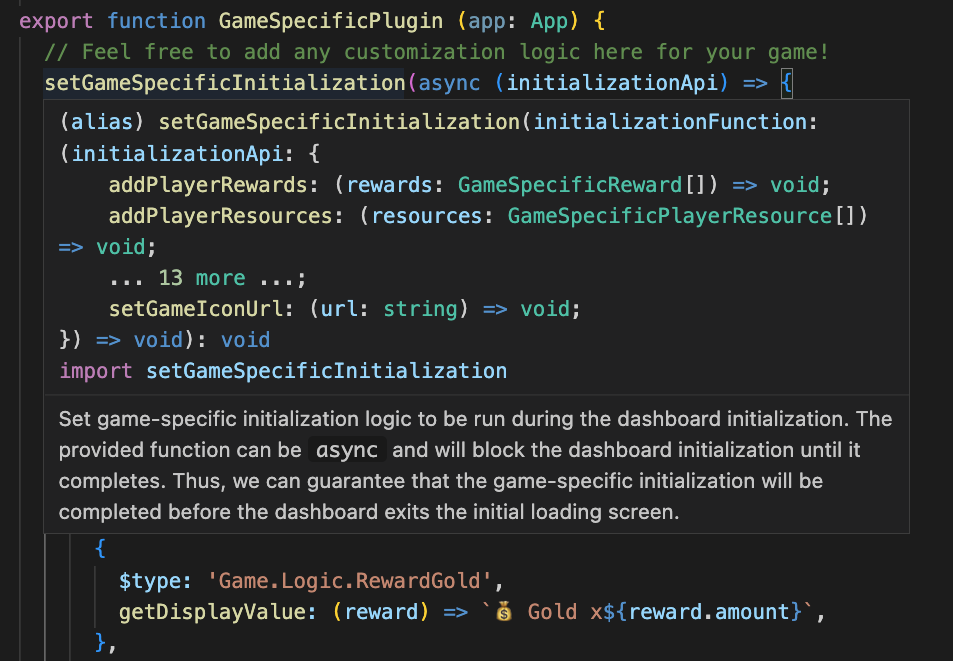
}You can use our API functions to modify how the dashboard works and even inject your own initialization code to run in the dashboard loading sequence. All API functions have full TypeScript types, annotation and documentation, including example code.
Reading data from the current game config is often necessary to control the integration. For example, you might want to provide visualization for game reward values that the designers set earlier in the game configs. To access this data during the initialization process, we provide the asynchronous getGameDataByLibrary(libraryNames: string[]) API function.
import { setGameSpecificInitialization } from '@metaplay/core'

export function GameSpecificPlugin (app: App) {
  // Feel free to add any customization logic here for your game!
  setGameSpecificInitialization(async (initializationApi) => {

    // Custom rewards (shown in many places like the player's inbox).
    initializationApi.addPlayerRewards([
      {
        $type: 'Game.Logic.RewardGold',
        getDisplayValue: (reward) => `💰 Gold x${reward.amount}`,
      },
      {
        $type: 'Game.Logic.RewardGems',
        getDisplayValue: (reward) => `💎 Gems x${reward.amount}`,
      },
      {
        $type: 'Game.Logic.RewardProducer',
        getDisplayValue: (reward) => `🛠 ${reward.producerId} x${reward.amount}`,
      }
    ])
  })
}Although the dashboard displays a lot of data out of the box, it only includes the generic elements defined in the core SDK. As your game grows, you will eventually want to add your own custom components to the various dashboard pages.
The built-in core pages use the UiPlacement system, which determines the components that are rendered on a page, and in what order. You can use this system to re-order the existing components to best suit your needs, remove ones that aren't important or even add completely new ones that are specific to your game.
You can use the addUiComponent API to add your own components to a placement and the removeUiComponent API to remove built-in components from a given page. The list of available placements grows with each release as more pages are updated. For the latest list, refer to the UiPlacementList.ts in the @metaplay/core module.
Let's begin by defining a new Vue component, NewComponent.vue, in your dashboard project's /src folder.
<template lang="pug">
//- A Metaplay UI card component.
MCard(title="Welcome")
  //- Render a greeting with the players name in it.
  h4 Hello {{ playerData.model.playerName }}!
</template>

<script lang="ts" setup>
import { useSubscription } from '@metaplay/subscriptions'
import { getSinglePlayerSubscriptionOptions } from '@metaplay/core'
import { MCard } from '@metaplay/meta-ui-next'

const props = defineProps<{
  playerId: string
}>()

// Subscribe to the data we need to render this component.
const {
  data: playerData,
} = useSubscription(() => getSinglePlayerSubscriptionOptions(props.playerId))
</script>To place a component on a specific page, select a destination from the available options in the UiPlacementList shown below. Each option clearly defines both the page where the component will appear and the exact section of that page where it will be positioned.
// This file is part of Metaplay SDK which is released under the Metaplay SDK License.

/**
 * A list of all the available placements for injecting UI components into the dashboard.
 */
export const uiPlacementList = [
  // Players Views
  'Players/Details/Overview:Title',
  'Players/Details/Overview:Subtitle',
  'Players/Details/Overview:LeftPanel',
  'Players/Details/AdminActions:Gentle',
  'Players/Details/AdminActions:Disruptive',
  'Players/Details/AdminActions:Dangerous',
  'Players/Details/Tab0',
  'Players/Details/Tab1',
  'Players/Details/Tab2',
  'Players/Details/Tab3',
  'Players/Details/Tab4',
  // Guilds Views
  'Guilds/Details/AdminActions:Gentle',
  'Guilds/Details/AdminActions:Disruptive',
  'Guilds/Details/AdminActions:Dangerous',
  'Guilds/Details/GameState',
  'Guilds/Details/GuildAdminLogs',
  // Incidents Views
  'PlayerIncidents/List',
  'PlayerIncidents/Details',
  'PlayerIncidents/ByType',
  // Leagues Views
  'Leagues/List',
  'Leagues/Details',
  'Leagues/Season/Details',
  'Leagues/Season/RankDivision/Details',
  // ScanJobs Views
  'ScanJobs/List',
  // Broadcasts Views
  'Broadcasts/Details/Tab0',
  'Broadcasts/Details/Tab1',
  'Broadcasts/Details/Tab2',
  // Matchmakers Views
  'Matchmakers/List',
  'Matchmakers/Details',
  // System View
  'System/Common',
  'System/Advanced',
  // Localizations Views
  'Localizations/List',
  'Localizations/Details/Tab0',
  'Localizations/Details/Tab1',
  'Localizations/Diff',
  // GameConfigs Views
  'GameConfigs/List',
  'GameConfigs/Details/Tab0',
  'GameConfigs/Details/Tab1',
  'GameConfigs/Details/Tab2',
  'GameConfig/Diff',
  // Overview View
  'OverviewView',
  // Developer View
  'Developers/List',
  // LiveOps Event View
  'LiveOpsEvents/List',
  'LiveOpsEvents/Details',
  // Game Server Message Center View
  'GameServerMessageCenter/List',
] as const
In this case, let's add the component to the 'Players/Details/Tab0' placement as follows:
import type { App } from 'vue'
import { setGameSpecificInitialization } from '@metaplay/core'

export function GameSpecificPlugin (app: App) {
  setGameSpecificInitialization(async (initializationApi) => {
    // Inject custom content into the player details page.
    initializationApi.addUiComponent(
      'Players/Details/Tab0',
      {
        uniqueId: 'NewComponent',
        vueComponent: async () => await import('./NewComponent.vue')
        // Set the 'displayPermission' property to require permission to view this component.
        // The component is hidden if a user does not have the required permission.
        // displayPermission: 'api.ExamplePermission',
      }
    )
  })
}Letting the page recompile, we can confirm that our custom component has been picked up and is now visible:
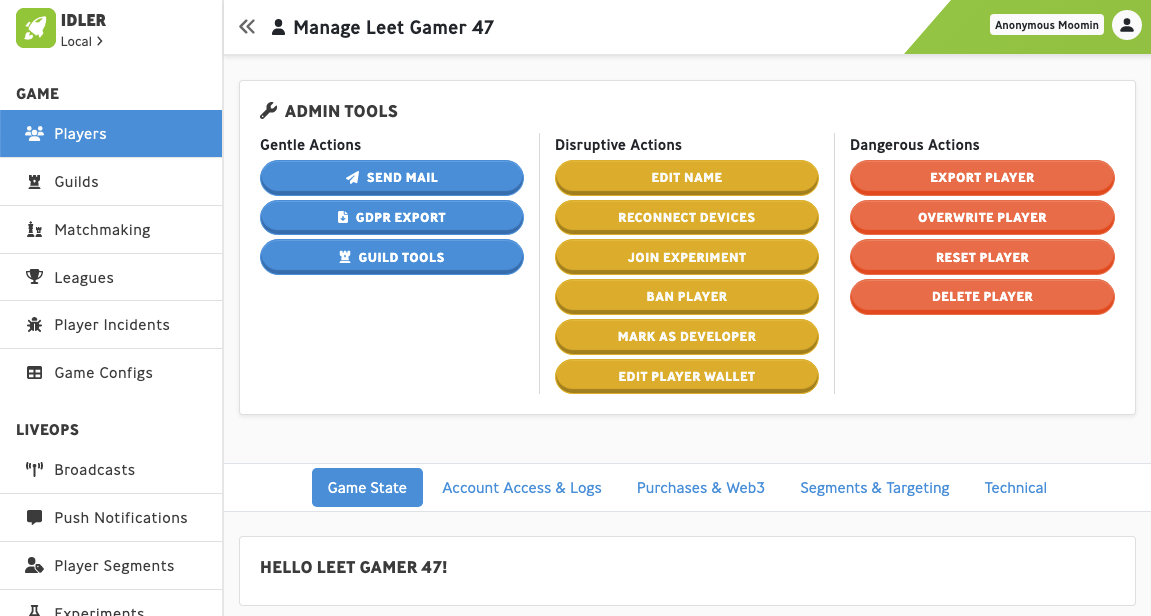
Our new component is not showing anything exciting here, but you can use these same techniques as a basis for your own components containing information that is specific to your game.
Adding a custom top-level view for game-specific needs, complete with an entry in the sidebar and a custom path in the URL, can be done in a few simple steps.
For this example, we'll create a new page from scratch:
<template lang="pug">
//- Our built-in root component for views.
MViewContainer
  //- Let's put a bit of text in to see that everything works.
  h1(class="tw-mt-4") Hello World!
</template>

<script lang="ts" setup>
import { MViewContainer }  from '@metaplay/meta-ui-next'

// Our view's logic would go here in the future.
</script>
Name this file something descriptive (we'll go with NewFeature.vue for this example) and save it to the /src folder inside your dashboard project.
In your gameSpecific.ts file, introduce the new view using the addNavigationEntry function and pass it your new Vue component. Then, you can browse the editor auto-complete to view what the optional parameters do, such as setting required permissions for the page.
export function GameSpecificPlugin (Vue: VueConstructor) {
  setGameSpecificInitialization(async (initializationApi) => {
    initializationApi.addNavigationEntry(
      {
        path: '/myFeature',
        name: 'View My Feature',
        component: async () => await import('./NewFeature.vue'),
      },
      {
        icon: 'calendar-alt',
        sidebarTitle: 'My Feature',
        sidebarOrder: 15,
        category: 'LiveOps',
      }
    )
  })
}Looking at the dashboard, you will see a new menu entry that links to the newly defined route. Accessing the route should load our new view.

The Metaplay UI component library is a collection of Vue components that are optimized for the LiveOps Dashboard. We use it internally to build the dashboard and recommend you use it for your custom components as well. For an interactive list of all available components and their usage, check out the Metaplay UI Component Library Documentation.
All our dashboard components use Tailwind CSS, a customizable and efficient framework for building modern, responsive UIs. With its extensive utility classes, you can control layout, color, spacing, and more, creating custom component designs directly in your HTML with minimal custom CSS. When you start styling your dashboard, we recommend browsing the Tailwind CSS documentation to learn more about it.
If that doesn't suffice, you may need to add some custom CSS, for example, if you're building a custom dashboard view or component. In these situations, here are the ways we recommend you do it:
Scoped Component Styles - You can add custom CSS to a specific component by adding a <style> tag to the component's .vue file.
<style scoped>
  /* CSS styling */
</style>
The scoped attribute attached to the style tag will ensure that your custom CSS styles only apply to the specific component and will not affect others. To learn more about the Vue styles block and how to add custom CSS classes, check out the Vue Documentation.
Custom CSS File - To apply a custom style across multiple custom components, we recommend that you add all styling in a single, global CSS file. This file is usually called game-specific-styles.css and is located in your game-specific styles folder.
Here's an example of how to add custom CSS to the external file:
/* Add a custom class */
.example-custom-class {
  background-color: rgb(134, 199, 51);
}Optimized production builds are generated automatically with the backend deployment scripts. No further action is needed!
Function | Description |
|---|---|
addActorInfoToOverviewPage | Adds custom actor information into the dashboard's landing page. |
add<listName>OverviewListItem | Adds custom item to a specified overview list. |
addInAppPurchaseContents | Adds custom in-app purchase content to the store. |
addNavigationEntry | Adds a new navigation route to the sidebar. |
addPlayerResources | Adds a custom resource displayed on the overview cards. |
addUiComponent | Adds a custom component to the dashboard. |
removeUiComponent | Remove a component on the dashboard. |
getGameDataByLibrary | Fetches the specified libraries from the game config during the initialization process. |
Full documentation for each API function can be found through your IDE.
Web development is a vast topic with excellent resources available all over the web. Here are some of the ones we would recommend:
Happy developing!