Appearance
Tutorial: Add an Admin Action
This page gives a practical overview of how to add a new admin action to the player details page of the LiveOps Dashboard.
Appearance
This page gives a practical overview of how to add a new admin action to the player details page of the LiveOps Dashboard.
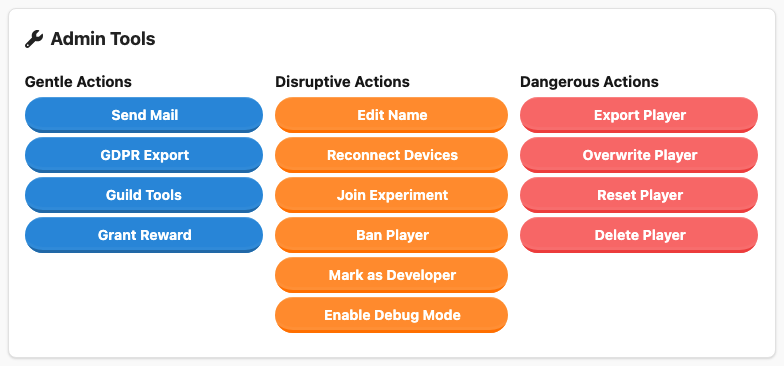
PlayerDashboardAction can be customized using the generated dashboard ui feature. Check out Working with Generated Dashboard UI for more details.The most common customization you might want to make to the LiveOps Dashboard is adding a new admin action. Admin actions are buttons that appear on the player details page and allow you to perform specific actions on a player, such as granting them a reward or changing their state.
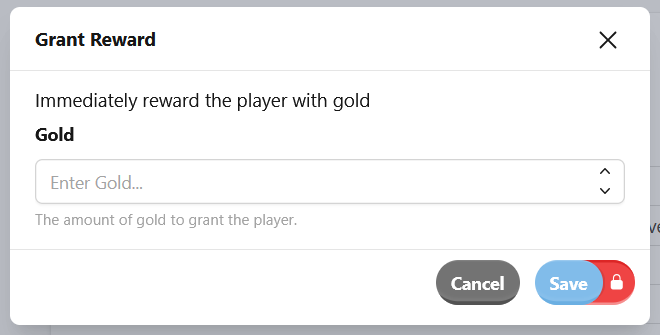
We'll be creating a basic action to grant the player some currency. The SDK will automatically generate the UI and handle audit logs and permissions for us. It'll look something this, but it can be customized using the generated dashboard UI feature, or you can provide a custom UI implementation.

To grant the player a reward when the button is clicked, add a new server action to the game server. Server actions are the server-side logic that can be triggered to modify player states.
First, add a unique "Action Code" for the action that you are about to write. Add an entry called AdminGrantReward to your list of action codes and assign it a unique numeric ID.
Next, add the following code to your PlayerActions.cs file. You can find the file inside the Assets/SharedCode/Player directory.
[ModelAction(ActionCodes.AdminGrantReward)]
public class PlayerAdminGrantReward : PlayerSynchronizedServerActionCore<PlayerModel>
{
    [MetaFormDisplayProps("Gold", DisplayHint = "The amount of gold to grant the player.")]
    [MetaFormRange(1, double.MaxValue, 1)]
    public int Gold { get; private set; }

    [MetaDeserializationConstructor]
    public PlayerAdminGrantReward(int gold) { Gold = gold; }

    public override MetaActionResult Execute(PlayerModel player, bool commit)
    {
        if (commit)
        {
            // Update player model with the reward.
            // TODO: Add your own reward and validation logic here.
            player.Log.Debug("Rewarded {Gold} gold", Gold);
        }

        return ActionResult.Success;
    }
}
Note the TODO in this code - No rewards are actually granted to the player. Granting a reward is highly game-specific, so we won't be doing that here. Instead, we will simply write a message to the game server log to show that the operation was triggered.
Next, add a button on the dashboard to trigger our PlayerAdminGrantReward. It's as simple as adding the PlayerDashboardAction attribute to your server action.
[ModelAction(ActionCodes.AdminGrantReward)]
[PlayerDashboardAction(title: "Grant Reward",
                       description: "Immediately reward the player with gold",
                       placement: AdminActionPlacement.Gentle)]
public class PlayerAdminGrantReward : PlayerSynchronizedServerActionCore<PlayerModel>
{
    ...
}
💡 Pro tip
By default the PlayerDashboardAction attribute uses a permission specific to the placement, and it's a good place to start. However, if you wish to manage permissions on a feature specific level, we recommend creating your own permission. For more info, see Creating Custom Permissions.
The game server does not hot reload code changes, so you need to restart your local game server for these changes to take place. After reloading, the button will show up on the dashboard.

Clicking our new button will open a modal window with the members from the server action as input.

In some cases, you might want to initialize the values in the modal window to a default value based on the player state. For example, unlocking or locking some content. You can do this by inheriting from the IPlayerDashboardAction<PlayerModel> interface and implementing InitializeDefaultStateForDashboard.
Set the requireInputBeforeAllowingConfirm parameter in the PlayerDashboardAction attribute to false, as the default value is now a valid input.
[ModelAction(ActionCodes.AdminGrantReward)]
[PlayerDashboardAction(title: "Grant Reward",
                       description: "Immediately reward the player with gold",
                       placement: AdminActionPlacement.Gentle,
                       requireInputBeforeAllowingConfirm: false)]
public class PlayerAdminGrantReward : PlayerSynchronizedServerActionCore<PlayerModel>
public class PlayerAdminGrantReward : PlayerSynchronizedServerActionCore<PlayerModel>, IPlayerDashboardAction<PlayerModel>
{
    ...

    public void InitializeDefaultStateForDashboard(PlayerModel model)
    {
        // 25% of the player's current gold is a meaningful amount to reward.
        Gold = model.NumGold / 4;
    }
}
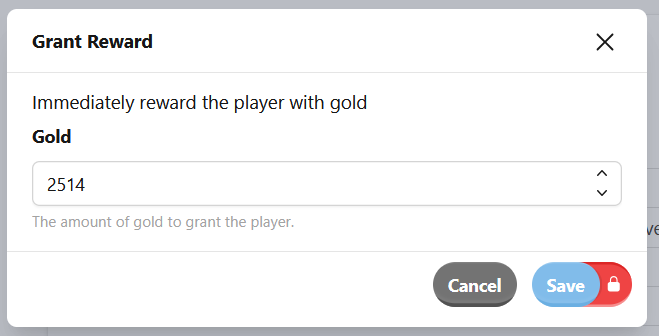
Opening our reward dialog on a player with ~10056 gold will now have a default value of 2514 gold.

When executing an admin action, we add a generic audit log entry to track the history of actions performed. The default implementation works for most projects; however, you might want to modify it in advanced use cases. As before, implement the IPlayerDashboardAction<PlayerModel> interface, then override the GetAuditLogPayload method. In this method, you'll return a custom audit log entry. See LiveOps Dashboard Audit Logs for more information.
[ModelAction(ActionCodes.AdminGrantReward)]
[PlayerDashboardAction("Grant Reward", "Immediately reward the player with gold", placement: AdminActionPlacement.Gentle)]
public class PlayerAdminGrantReward : PlayerSynchronizedServerActionCore<PlayerModel>
public class PlayerAdminGrantReward : PlayerSynchronizedServerActionCore<PlayerModel>, IPlayerDashboardAction<PlayerModel>
{
    ...

    [MetaSerializableDerived(AuditLogEventCodes.AdminGrantReward)]
    public class GrantRewardEventLogEntry : PlayerEventPayloadBase
    {
        public GrantRewardEventLogEntry(int gold)
        {
            Gold = gold;
        }
        public override string EventTitle => "Granted Reward";
        public override string EventDescription => $"Player received {Gold} gold.";
        [MetaMember(1)]
        public int Gold { get; private set; }
    }

    public PlayerEventPayloadBase GetAuditLogPayload()
    {
        return new GrantRewardEventLogEntry(Gold);
    }
}In simple cases, the generated UI works well; however, for more complex actions, you might want to write your own UI altogether. You'll still get the benefits from the server integration, like audit log entries, permission handling, and initialized values.
To follow this section, you should be comfortable with writing and understanding HTML, CSS, and TypeScript code. You should also have the liveops dashboard initialized and running locally. Check out the Developing the LiveOps Dashboard guide for more details.
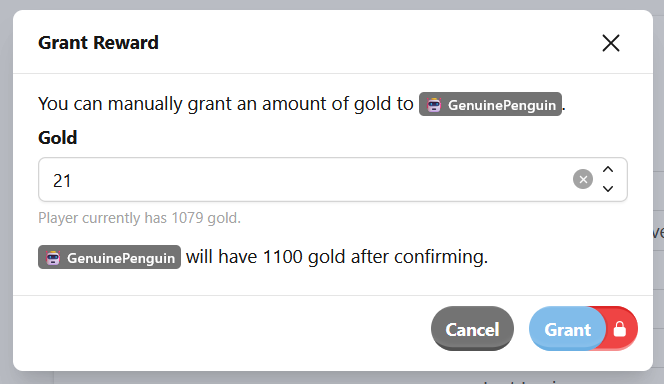
You'll be creating the modal below. It's not very different from the auto-generated UI component, however is a good starting off point to start customizing further.

Start by replacing the auto-generated UI component. Do this by invoking updateUiComponent in the setGameSpecificInitialization in gameSpecific.ts. Pass the UiPlacement as the first parameter. For admin actions, this is always Players/Details/AdminActions:{Placement}. We defined the placement above in the PlayerDashboardAction attribute; in this case, it's Gentle. The targetId is the same as the title from the same attribute. We also pass a vueComponent to render instead. Import your new component here.
export function GameSpecificPlugin(app: App): void {
  setGameSpecificInitialization(async (initializationApi) => {
    // Insert our own 'Grant Reward' component.
    initializationApi.updateUiComponent(
      'Players/Details/AdminActions:Gentle',
      'Grant Reward',
      {
        vueComponent: async () => await import('./GrantReward.vue'),
    })

    ...
  }
}
We'll also have to create the GrantReward.vue component that we imported previously.
<template lang="pug">
div Hi from our new component
</template>

<script lang="ts" setup></script>
This is about as simple as a component could be. Just rendering some text is not very useful, so let's customize it.
Here we'll recreate the modal window from before manually:
<template lang="pug">
MActionModalButton(
  v-if="playerData && actionData"
  modal-title="Grant Reward"
  :action="() => executeAction()"
  trigger-button-label="Grant Reward"
  ok-button-label="Grant"
  :permission="actionData.permission"
  @show="resetModal"
  )
  p(class="tw-mb-1") You can manually grant an amount of gold to #[MBadge {{ playerData.model.playerName }}].
  MInputNumber(
    label="Gold"
    :model-value="gold"
    :min="0"
    :hint-message="`Player currently has ${playerData.model.wallet.numGold} gold.`"
    allow-undefined
    class="tw-pb-3"
    @update:model-value="gold = $event"
    )
  p(class="tw-mb-1") #[MBadge {{ playerData.model.playerName }}] will have {{ playerData.model.wallet.numGold + gold }} gold after confirming.
</template>

<script lang="ts" setup>
import { ref, computed } from 'vue'
import type { ComputedRef } from 'vue'

import { getSinglePlayerSubscriptionOptions, type DashboardActionData } from '@metaplay/core'
import { useGameServerApi } from '@metaplay/game-server-api'
import { MBadge, MInputNumber, MActionModalButton } from '@metaplay/meta-ui-next'
import { useSubscription } from '@metaplay/subscriptions'

const props = defineProps<{
  /**
   * ID of the player to set as developer.
   */
  playerId: string
  /**
   * The full C# type of the field to show, can be used as a key to find the relevant actionData.
   */
  typeName: string
}>()

const gameServerApi = useGameServerApi()
/**
 * Query the player's data
 */
const { data: playerData, refresh: playerRefresh } = useSubscription(() =>
  getSinglePlayerSubscriptionOptions(props.playerId)
)

/**
 * Extract the action data for the specific `typeName` action.
 */
const actionData: ComputedRef<DashboardActionData> = computed(() => {
  return playerData.value?.playerSpecializedActions.find((x: any) => x.typeName === props.typeName)
})

const gold = ref<number>()

/**
 * Reset the modal to use the default initial values
 */
function resetModal(): void {
  gold.value = actionData.value.initialState.gold
}

/**
 * Execute the action on the server.
 */
async function executeAction(): Promise<void> {
  // Construct the value to send to the server
  const value = {
    $type: props.typeName,
    gold: gold.value,
  }

  await gameServerApi.post(`/dashboardActions/${props.playerId}/execute`, value)
  playerRefresh()
}
</script>
And we're done! This is a good jumping-off point for you to start customizing.
The above is just a simple example of what can be achieved, you can get a lot more creative and advanced. Here's some resources to help you get started:
PlayerDashboardAction can be customized using the generated dashboard ui feature, check out Working with Generated Dashboard UI for more details.