Appearance
Tutorial: Game Configs
Integrate game configs to remotely configure and balance your game.
Integrate game configs to remotely configure and balance your game.
In the previous Tutorial: Minimal SDK Integration chapter, we integrated the Metaplay SDK into our sample project, making it ready for adopting Metaplay's advanced features.
In this chapter, we will start using over-the-air updatable game configs, which later will allow us to add some of Metaplay's LiveOps features into our project. Specifically, player segmentation and A/B testing.
This is a practical guide to setting up a specific game configs workflow. Metaplay's game configs feature is a lot more powerful than what we'll be using in this tutorial, but this should give you a good starting point. You can check out Working with Game Configs for a more complete guide.
Game configs are the center of a lot of Metaplay features, but most importantly they enable over-the-air updating and A/B testing your configuration.
We have created a Google Sheets spreadsheet to use as the source data for our game configs. You could use any other data source instead, but Google Sheets remains popular for game designers and is a good starting point.
We kept the data as simple as possible to get started, and will be incrementally adding more content to the game config sheet in upcoming steps. For convenience, we will be creating full copies of the sheet for each step of this tutorial to make it easier to follow along.
To get started, we'll move over the configuration for how often power ups and premium currency spawns during a level. Here is an excerpt of our source spreadsheet:
| Member | Value | // Comment |
|---|---|---|
| EvaluationInterval | 1.5 | The distance in meters between each possible item location |
| MinPowerUpInterval | 100 | The minimum distance in meters since the last power up, starting at 0% chance up to 100% at MaxPowerUpInterval |
| MaxPowerUpInterval | 5000 | |
| MinPremiumInterval | 1000 | The minimum distance in meters since the last premium currency, starting at 0% chance up to 100% at MaxPremiumInterval |
| MaxPremiumInterval | 10000 |
Let's start by defining the data format of our configuration. Define a new class inheriting from GameConfigKeyValue<TSelf>:
[MetaSerializable]
public class TrackConfig : GameConfigKeyValue<TrackConfig>
{
    [MetaMember(1)]
    public F32 EvaluationInterval { get; private set; }

    [MetaMember(2)]
    public int MinPowerUpInterval { get; private set; }

    [MetaMember(3)]
    public int MaxPowerUpInterval { get; private set; }

    [MetaMember(4)]
    public int MinPremiumInterval { get; private set; }

    [MetaMember(5)]
    public int MaxPremiumInterval { get; private set; }
}
After that, create a new file SharedGameConfig.cs in the SharedCode directory, and define a new class inheriting from SharedGameConfigBase with an entry TrackConfig:
public class SharedGameConfig : SharedGameConfigBase
{
    [GameConfigEntry("TrackConfig")]
    public TrackConfig TrackConfig { get; private set; }
}
And, that's all! We can now use TrackConfig anywhere in our code:
TrackConfig config = MetaplayClient.PlayerModel?.GameConfig.TrackConfig;

// The distance between each powerup and currency
float increment = config.EvaluationInterval.Float;
Let's do something similar for the shop. A shop is a collection of items, so let's use a GameConfigLibrary instead. Define the data format for each item in the shop by inheriting from IGameConfigData<TKey>:
[MetaSerializable]
public class ShopId : StringId<ShopId> {}

[MetaSerializable]
public class ShopItem : IGameConfigData<ShopId>
{
    [MetaMember(1)]
    public ShopId ConfigKey { get; private set; }

    [MetaMember(2)]
    public Category Category { get; private set; }

    [MetaMember(3)]
    public PlayerReward Reward { get; private set; }

    [MetaMember(4)]
    public int PremiumCost { get; private set; }

    [MetaMember(5)]
    public int CoinCost { get; private set; }
}
MetaRewards
We're using MetaRewards to define the rewards that are given to the player when they purchase an item. MetaRewards are a Metaplay feature to streamline giving items and other rewards to players, and you can find more about them on the Implementing MetaRewards page.
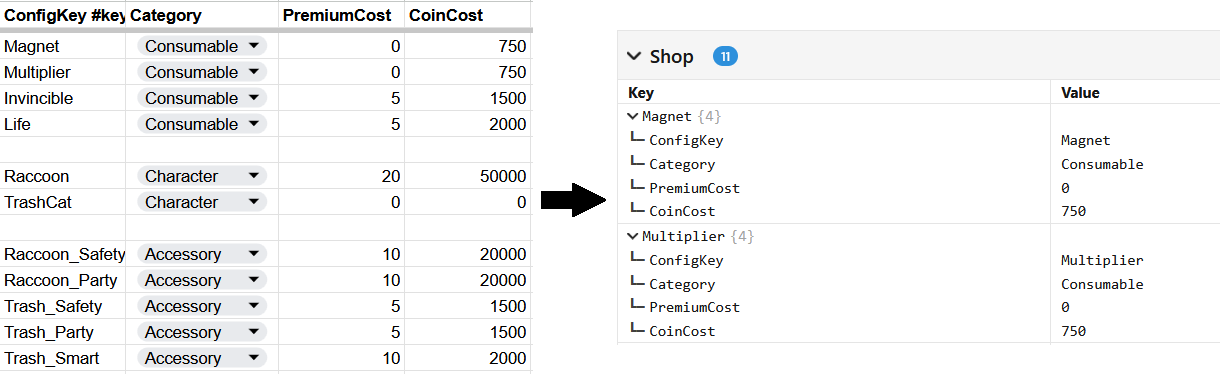
As you might've noticed, the shop item contains a new ConfigKey property. We're working with a dictionary of items, which means that each item needs a unique key. This is what an excerpt of our source spreadsheet looks like:
| ConfigKey #key | Category | Reward | PremiumCost | CoinCost |
|---|---|---|---|---|
| Magnet | Consumable | Magnet | 0 | 750 |
| Life | Consumable | Life | 5 | 2000 |
| Raccoon | Character | "Rubbish Raccoon" | 20 | 50000 |
| TrashCat | Character | "Trash Cat" | 0 | 0 |
| Raccoon_Safety | Accessory | "Rubbish Raccoon"/Safety | 10 | 20000 |
Let's continue. Add a new GameConfigLibrary to the SharedGameConfig:
public class SharedGameConfig : SharedGameConfigBase
{
    [GameConfigEntry("TrackConfig")]
    public TrackConfig TrackConfig { get; private set; }

    [GameConfigEntry("Shop")]
    public GameConfigLibrary<ShopId, ShopItem> Shop { get; private set; }
}
And update the shop to read from the game config instead of a static configuration:
public override void Populate()
{
    m_RefreshCallback = null;
    foreach (Transform t in listRoot)
    {
        Destroy(t.gameObject);
    }

    // foreach (var (key, value) in Shop.Instance.Consumables)
    foreach (var (key, value) in MetaplayClient.PlayerModel.GameConfig.Shop.Where(x => x.Value.Category == Category.Consumable))
    {
        SpawnShopItem(value, key);
    }
}
Lastly, we'll create and use a BuyItem action to authoritatively add the item to the user's inventory and subtract the currency:
[ModelAction(ActionCodes.BuyItem)]
public class BuyItemAction : PlayerAction
{
    public ShopId ID { get; }

    [MetaDeserializationConstructor]
    public BuyItemAction(ShopId id)
    {
        ID = id;
    }

    public override MetaActionResult Execute(PlayerModel player, bool commit)
    {
        // Verify that the item the player is trying to purchase does actually exist
        if (!player.GameConfig.Shop.TryGetValue(ID, out var shopItem))
            return ActionResult.InvalidItem;

        int newCoins = player.PlayerData.NumCoins - shopItem.CoinCost;
        int newPremium = player.PlayerData.NumPremium - shopItem.PremiumCost;

        // Verify that the player can afford the item
        if (newCoins < 0 || newPremium < 0)
            return ActionResult.InsufficientFunds;

        if (commit)
        {
            // Purchase success! Subtract the funds and give the reward to the user
            player.PlayerData.NumCoins = newCoins;
            player.PlayerData.NumPremium = newPremium;

            shopItem.Reward.InvokeConsume(player, source: null);

            player.EventStream.Event(new ItemReceivedEvent(shopItem.Reward.Type, shopItem.Category.ToString(), 1, shopItem.CoinCost, shopItem.PremiumCost, Context.Store));
        }

        return MetaActionResult.Success;
    }
}private static bool ExecuteBuyItem(ShopId id)
{
BuyItemAction action = new BuyItemAction(id);
return MetaplayClient.PlayerContext.ExecuteAction(action).IsSuccess;
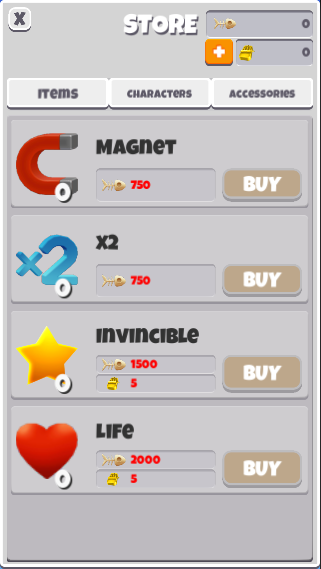
}That's it! The shop items are now visible with their correct prices.
We introduced game configs to configure power up spawning, populate the shop as well as an action to purchase items in a cheat-proof way. All that is left is to create and build your game configs.
The simplest way to build and publish game configs is to use Metaplay's Game Config Build Window in Unity.
metaplay dev server and it will detect that your game config files have changed and automatically publish it.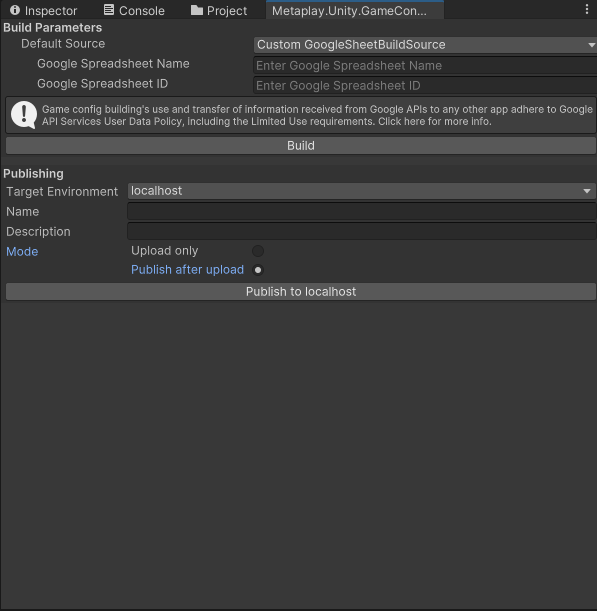
Building & Publishing via LiveOps Dashboard
You can also configure the game server to be able to build and publish game configs, so that you can do builds without touching Unity. For simplicity, we'll be using the Unity editor for this tutorial. Check out Managing Game Configs from the Dashboard for more info.
If you want to play around with the game config, you can modify the values in the game config sheet and build it again.
Custom GoogleSheetBuildSource. Fill in a name and the spreadsheet url.